Before starting to create an XML sitemap for the WordPress site, you should know about what is sitemap as well as what is the use of it. Nowadays, many people still don’t know what is a sitemap. Don’t worry; this article will be helping you to understand better.
What Is Sitemap?
You may have heard many definitions of sitemap. But, let me tell you once again in a simple definition.
“Sitemap is an XML/HTML file which contains all pages of your site.” Or we could say “It’s an XML/HTML file that organizes all pages of your site.”
Advantages of Sitemap:
- It improves the crawling performance of your site.
- It lists all pages of your site and tells search engines (Google, Bing…etc.,) about your pages and used to get indexed in a proper way.
- It’s very useful for your visitors to go through or navigate your all pages easily and in a quick way.
Now, we are in the stage of creating a sitemap for your website.
1. Generating an XML Sitemap for WordPress:
Actually, there are different kinds of ways to create a sitemap. Many people have used familiar plugins like Yoast, etc. to generate XML sitemaps. But, here I have used an XML sitemap generator tool for my site. Yes! There are many online tools available to generate an XML sitemap for a WordPress site. So, just go to one of the most familiar online tools and drop your website URL into the URL field and click start to generate your sitemap then you will get your XML sitemap file. Here is an online tool that I used to generate my XML sitemap file: XML-sitemaps.
2. Uploading XML Sitemap:
After generating the sitemap file, you’ll have to upload this file into your root directory in your C-panel which shows something like public_html then the uploading process has been finished. Now the third step is a very important one.
3. Tell Google about Your Sitemap:
I know, now a question will arise about how to tell Google about my sitemap. We could say a sitemap is an intermediate between your website and search engines as it tells search engines about every change made on your website. Well, now you have to go to your Google webmaster tools aka Google Search Console. I hope you are already having linked your site with Google Webmaster to be verified. If you are not linking yet, you should have to link by adding your site to google webmaster.
Here are the steps for adding your site or getting verified in Google Webmaster. Actually, there are many ways to add your site. But here I am telling you what I did.
- First, you should be signed in to your Google account.
- After signing in, there is an option which is called “Add a property”
- After adding your property( website), you will be on the next screen to verify. There you can see two methods one is “Recommended methods” and “Alternative methods”. We can go with the Alternative methods option which is easy to do it.
- When you click the option, it will show 3 options.
1. HTML Tag
2. Google Analytics
3. Domain Name Provider
- We can click the HTML tag option, and then you can see the HTML code for your site. Copy and Paste the code in the header area of word press admin dashboard. That’s it! Come back to your “Alternative methods window” and click verify. Now your site has been verified.
After that, go to your webmaster dashboard and there you can see the label “Sitemap” under the “Crawl” option on the left side. Now click the option to add your site. When you add your site in the sitemap option, make sure the sitemap file name as the same as the sitemap name which you uploaded in your root directory. It’s very important. You can see the screenshot given below.

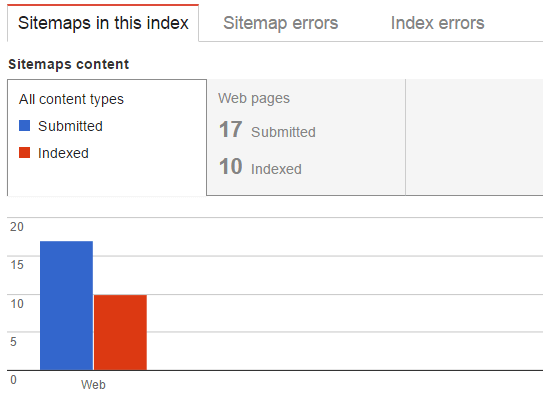
Now, your XML sitemap for WordPress has been submitted successfully for your website which looks like below.

Do visit often Google webmaster tools to check your sitemap as it gives analysis about your pages.

